Article
Gun up or Gun Down?
(This first appeared as an article in the CPSA's Pull! magazine in September 2020)
Gun up, gun down. What’s it to be?
It’s all a matter of personal choice really, major sporting and skeet championships have been won by both gun-up and gun down competitors, so it looks as if there is no advantage using one method over the other. There are pros and cons for either, the gun-up shooter can ensure that they have a ‘perfect’ mount, a constant sight picture, the barrels not too high (as to obscure the target) but the initial inertia of the ‘dead-gun’ effect has to be overcome by a bit of practice. The gun-down shooter, on the other hand, uses core body movement to generate a smooth, fluid swing to the target, has a clear view of the target (as the gun is out of his or her eye line) but to achieve a constant sight picture every time the gun is mounted has to perfect the movement of the gun from rest to the shoulder socket and cheek whilst bringing the gun to the target simultaneously. This is going to take a lot more time to overcome.
Both English Sporting and English Skeet give you the option to shoot with the gun in or out of your shoulder (gun up or down) when calling for your target. FITASC Sporting, on the other hand, gives you no option and you must start with the gun out of your shoulder, the heel of the gun under the FITASC line on the shooter’s vest and it must stay there until the target comes into view. If the gun is moved above the line before the emergence of the target, a warning is given, should it happen again, then the target is lost as it is with any further occurrence of the same fault. The line is embroidered on the vest and located 25 centimetres from the central axis of the shoulder. Olympic Skeet is another discipline where the gun must be out of the shoulder and complying with the ready position when calling for the target. We will discuss how this can be achieved later.
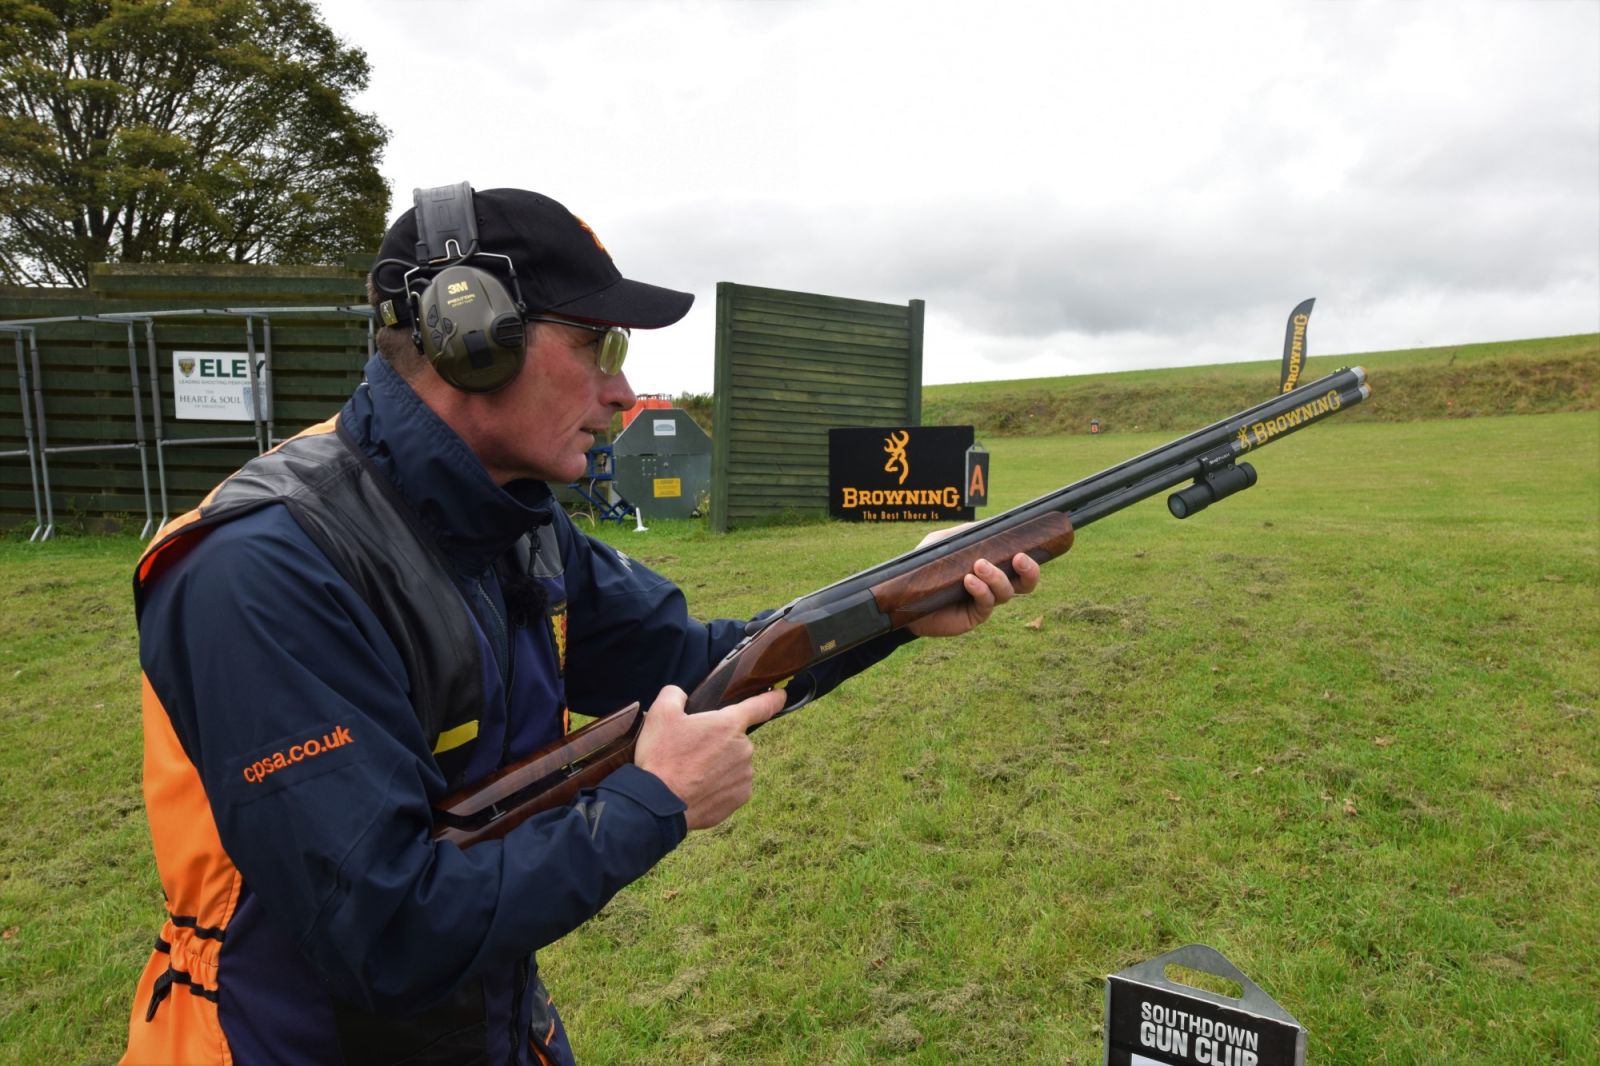
(Above: CPSA Senior Coach Simon Arbuckle demonstrates the unmounted position for FITASC Sporting.)
The gun-up shooter has all the time in the world (within reason and a patient referee) to get the gun mounted perfectly whereas the gun-down shooter doesn’t have that luxury, their gun mount has to be as near perfect as possible. We have an exercise that will achieve that, should you want to give FITASC Sporting a go, which utilises the ‘parallel mount’. You will need a decent size mirror for this exercise.
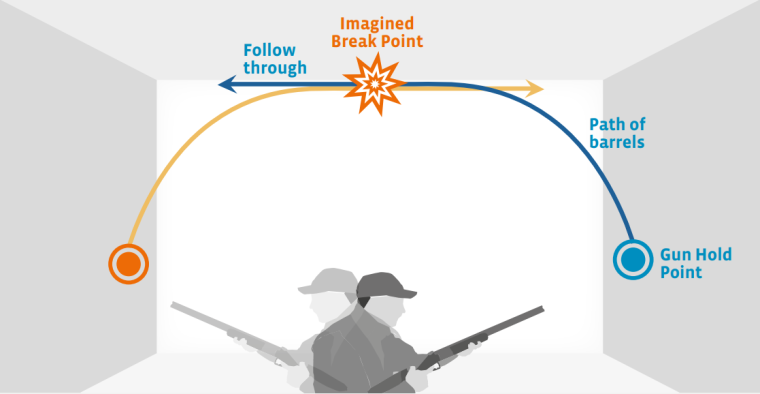
As the position of the eye on the rib determines where the shot is placed, we are going to mount the gun to our shooting eye (the one that is over the rib). Stand three or four metres from the mirror. Adopt your normal shooting stance facing the mirror with the gun out of your shoulder situated comfortably at your waist and the barrels parallel to the ground. Start with the gun from this position and with both hands working in unison with one another, raise the gun to your shoulder socket and cheek simultaneously ensuring that the barrels and stock are lifted as one, the barrels neither leading nor lagging the stock. Mount the gun to your iris (coloured part of the eye) so that it is sitting centrally on the rib. On the range when shooting a target, starting at the hold position, the gun is held parallel to the target and just under its flight path. It then becomes very easy to mount the gun to the target simultaneously with it coming into your face and shoulder socket.
Repeat this movement five times then close your eyes, mount the gun again and check where the gun is pointing with relation to your eye. The day that you open your eyes and the rib is smack under your eye, your hard work will have been rewarded and you will have achieved a perfect parallel mount which will give you the advantage of only having to focus on the target, not the mount nor the whereabouts of the rib.
Do this practice for five to ten minutes a day and you will achieve the necessary muscle memory in two and a half to three months. Olympic athletes say that installing muscle memory takes approximately 10,000 repetitions of the exact movement to become permanent. Don’t rush it, take your time and get it perfect, the speed will come. Only perfect practice makes perfect, practice without direction makes permanent! You need to input the correct action right from the start.
Swing practice:
The aim here is to achieve a smooth fluid swing coupled with the ability to follow the line of the target and overcome stopping the gun as soon as the trigger is pulled.
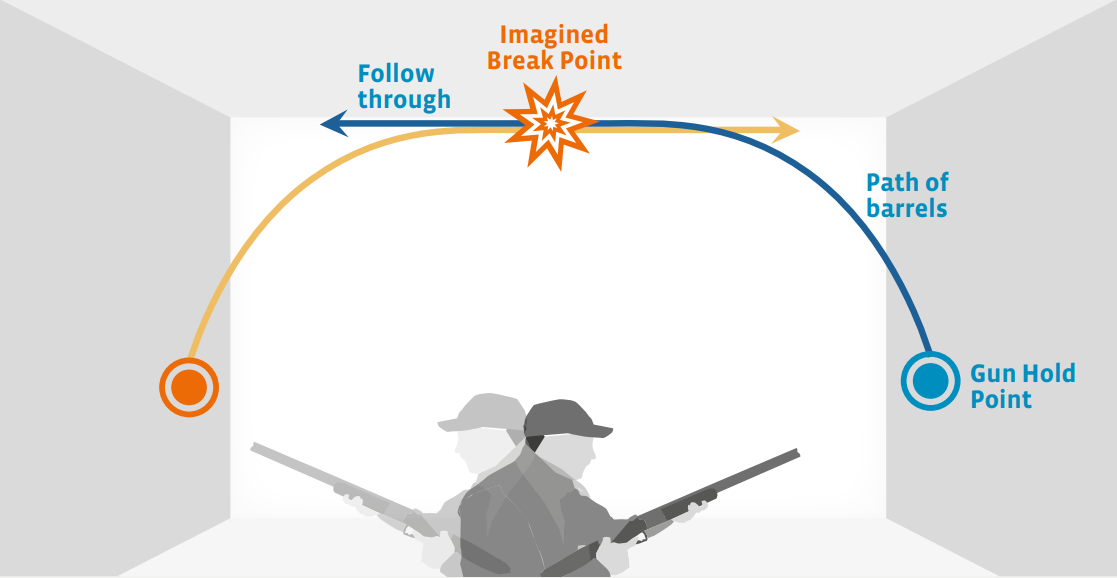
(Above: How to do swing practice.)
You will need a Snap Cap for this exercise: Start by standing in the middle of the room facing a wall in the lounge (close the curtains so you don’t frighten the neighbours) and the gun halfway up the wall in the corner to your right (if right-handed) because a right to left movement is your natural direction of swing (halfway up the wall on the left-hand corner if left-handed). Start the mount by moving the gun from the ready position (at your waist) on a tangent to the line where the wall meets the ceiling, the same time that you are bringing the gun to your shoulder socket and face. Follow the line of this join to the centre of the wall, pull the trigger and keep the gun moving to the far corner. Bring the gun down and open, replace the Snap Cap and this time, start with the gun half-way up the wall on the left-hand-side and repeat the exercise. Do this for about five to ten minutes a day and your mount will become smoother, unrushed and the whole movement more fluid than before and you will have mastered moving and mounting at the same time. Don’t forget that if you use snap caps for this exercise, the place to leave them when you are done is at home, and separate from your live cartridges to avoid any confusion.
The Pivot Mout:
The pivot mount is used for Olympic Skeet. We need a fast, accurate mount for Olympic Skeet because of the target’s speed, the timing of the release (which is variable) and the gun being out of the shoulder until the target is in view. Unlike English Skeet, the target is not (necessarily) released on your call. It may be released immediately or anything up to three seconds later and if the gun is moved before the emergence of the target a penalty is invoked. The gun’s stock must be below the line on the shooter’s vest which corresponds to the lowest point of the elbow (of the shooting shoulder). The stock is relatively low to the barrels in the ready position, the barrels will need to be moved forward at the same time as it is pivoted around the forehand bringing the stock to the shoulder socket and cheek. Without this movement, a see-sawing action could be induced, the gun oscillating high and low on the target. The gun is driven smoothly and fluidly to the target using the body’s core (not the arms in isolation), with the feet pointing to the break zone.
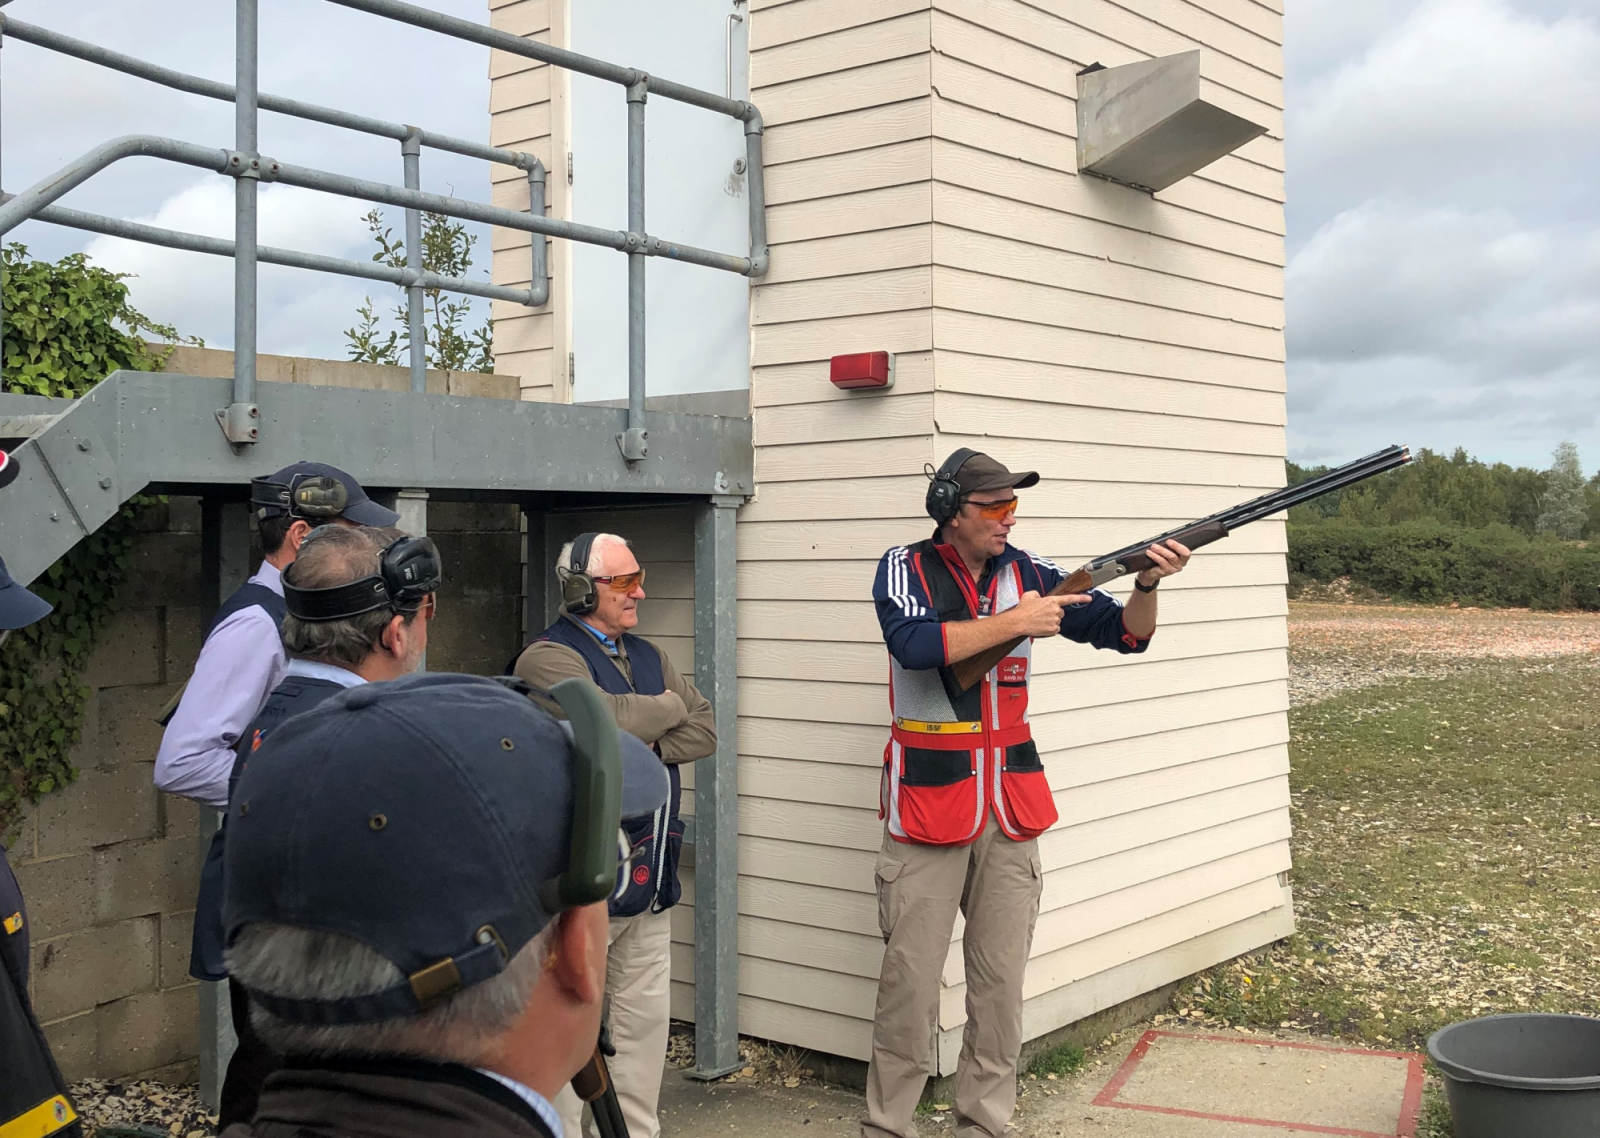
(Above: National Clay Shooting Centre Head Coach David Dale teaching the Olympic Skeet mount to a group of CPSA English Skeet Coaches.)
Dry Mount Practice:
Dry mount practice can be achieved in the lounge by facing a wall and mounting the gun to various spots on the wall either in the wallpaper or spots that you have placed on it. Just adopt your stance with the gun in the ready position and then mount to each of the spots in succession for about five to ten minutes a day. Again, take your time and don’t rush, you are creating that muscle memory which over time will improve the consistency of the mount and your scores.
| Dry Mount Practice Checklist: |
|---|
|
Gun placement. The gun needs to be mounted in the shoulder socket with the heel of the gun just under the top of the shoulder at the same location each time. |
|
Cheek placement. The bottom of the cheekbone needs to be on the top of the comb (providing the gun fits). This ensures that the eye is placed centrally over the rib and at the same height every time the gun is mounted achieving a constant sight picture and consistency in shot placement. |
| Finger placement. The part of your finger that should be in the middle of the trigger blade is the first section (under the nail) of your index finger, not the crease of that first section. If the edge of the trigger blade is on this crease, you may be unable to place any pressure onto the blade which will result in the gun not firing. |
There is no time like the present to improve your mount (providing you need to), you will never get another opportunity like it so go on, instal that muscle memory, you’ll never regret it! These dry mount exercises may seem a bit of a pain (there’s no quick fix in this game), but it’s the only way to perfect your mount.
Mike Williams.
CPSA Academy Senior L3 Coach.